Clone Your Own
Grow shrubs from stem cuttings
By Carla Burgess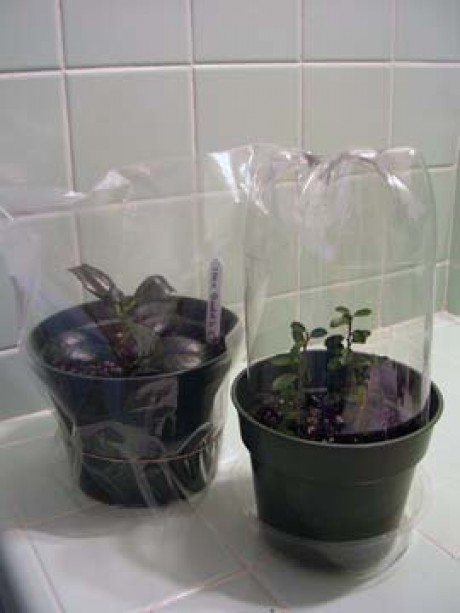
Taking cuttings is an inexpensive way to multiply some of your garden favorites or to propagate a friend's or neighbor's plant that you've been admiring. In addition, it may be the only way to obtain plants that are hard to find or lost to the nursery trade. To produce a plant that has identical characteristics (such as bloom color), the only way to ensure an exact copy, or clone, is to propagate it using vegetative techniques such as by rooting a stem cutting.
Many kinds of woody plants are fairly easy to grow from stem cuttings, if you follow a few guidelines. Start by learning a bit about the propagation requirements of the species you select, as some will not produce roots via stem cuttings.
It's critical to take the cutting at the right time. Depending on the species, plants will root in either or all of the following stages of growth: softwood, semi-hardwood or hardwood. Forsythias and camellias, for example, may be propagated from softwood, semi-hardwood or hardwood cuttings. Blueberries, on the other hand, are best rooted from softwood or semi-hardwood cuttings. Take your cue from the growth stage of the plant, not the calendar.
Identifying growth stages
- Softwood—new growth that is slightly firm; stems will snap easily when bent.
- Semi-hardwood—the current season's growth that has partially matured or "hardened"; at this time, leaves will have reached their full size.
- Hardwood—the mature growth from the previous year's growth; plants are dormant at this stage. With deciduous species, hardwood cuttings may be taken after leaves have dropped and up until the time that new shoots appear. Don't take the term "hardwood" literally—brittle stems (from two or more seasons ago) are generally no longer viable for cuttings.
Your success also depends on using the right growing medium and providing proper moisture and other environmental conditions. Your set-up doesn't have to be fancy: It can be as simple as a pot covered with a plastic bag.
Growing medium
A soil-less mix is the best medium and usually includes combinations of peat, perlite or sand. The medium needs to be coarse, or porous, so that air can circulate around the stem. You can make this mixture yourself by combining equal amounts of peat and perlite (1:1 ratio). Other possible recipes are 1 part peat: 1 part sand. Use sharp sand such as builder's sand, not children's sandbox sand. In lieu of peat, you can substitute the same amount of coir (coconut husk fiber) or very fine pine bark (you may need to sieve it to remove any large pieces). The growing medium should be thoroughly moistened before you insert cuttings. Don't add any fertilizer until after roots have formed. The medium should be kept moist but not saturated or the cuttings will rot. Fill the cutting "bed" with at least 3 inches of medium. Make sure containers have adequate drainage holes.
Rooting aids
Cuttings will produce roots faster and in greater abundance with the aid of a rooting hormone. Two types of synthetic rooting hormones are widely used. Naphthaleneacetic acid (NAA) is found in products such as Rootone, which is sold in powdered form. Indolebutyric acid (IBA) is the primary ingredient in products such as Dip 'n Grow, a liquid form. Some rooting hormones are also available in gel form. Liquid form is highly recommended for new propagators working with woody cuttings, but powder is acceptable. If you can't find rooting hormones locally, check mail-order gardening catalogs or search for sources online.
Taking and sticking the cuttings
Take cuttings from plants that are free of disease and not drought-stressed. Use sharp hand pruners or a knife to sever the stem. Make a clean cut, leaving no ragged edges. A typical cutting is 4 to 6 inches long. However, cuttings of slow-growing or dwarf plant varieties will necessarily be shorter, as there is a scant amount of new growth each year. Before sticking the cutting, remove the leaves from the lower one-third to one-half of the stem. Also remove any flowers or seeds. Dip the base of the cutting into the liquid hormone for 1 second, give it about a minute to dry, then stick it into the medium just deeply enough that it can support itself—in general, no more than a third its length. (If using powder, tap the cutting gently to shake off excess powder.) You may insert several cuttings into the same pot, or use a communal bed such as a pan or flat. Do not push cuttings all the way to the bottom. Place cuttings 1 or 2 inches apart, with no leaves touching. If inserting cuttings into individual pots, cover with a clear or opaque plastic bag to maintain humidity. If using trays, cover with a plastic lid. Whatever type of containers you choose, be sure there are adequate drainage holes.
Tending the cuttings
If you root cuttings indoors, place containers in a relatively warm location underneath fluorescent lighting, if possible (fixtures or "shop lights" with bulbs are readily available at hardware stores). During the growing season, cuttings may be rooted outdoors. Cover containers and place in a location out of direct sunlight. If your modified greenhouse becomes overheated, cuttings will perish. Water your medium if necessary, or mist cuttings with a spritzer or spray of the hose. You should see a little "fog" from the humidity inside. Remove the cover only if necessary to vent excess heat or to add water.
Wait at least three weeks before disturbing the cuttings. Most cuttings will root in several weeks to a couple of months. You'll know that roots have formed if you feel a bit of resistance when you give the cutting a gentle tug. Pot the rooted cuttings individually and apply a dilute fertilizer initially. Pamper your young plants, and wait for a season or two before transplanting them in the garden.
Tips & Tricks
If it is warm outdoors and you'll be transporting them some distance, seal fresh cuttings in a plastic bag and carry them in a cooler. It is very important that they not dry out.
The following simple containers may be used for rooting cuttings: A terrarium or plastic bin topped with a piece of plastic. A plastic soda bottle or milk jug inverted over the top of a pot. A plastic pot placed inside a sealed plastic bag.
Manipulating peat and perlite sends up a large amount of dust. Before handling it, spray water inside the bag to wet it down. You may want to wear a dust mask while mixing the medium.
Some articles suggest you "wound" the base of the cutting before sticking it. If wounding is suggested, do not "grate" or otherwise peel the bark off the cutting. You will make just a small, shallow incision.
Resources
"Growing and Propagating Showy Native Woody Plants" by Richard Bir
"Manual of Woody Landscape Plants: Their Identification, Ornamental Characteristics, Culture, Propagation and Uses" by Michael Dirr
"Plant Propagation by Stem Cuttings: Instructions for the Home Gardener" (NCSU Horticultural Information Leaflet #8702) by Frank Blazich (Download at www.ces.ncsu.edu/depts/hort/hil/hil-8702.html or contact your Cooperative Extension agent to request a copy.)
-
Share this story: