How to Get Great Photos in the Field
Reflections on making the most of nature’s canvas
By Robin Conover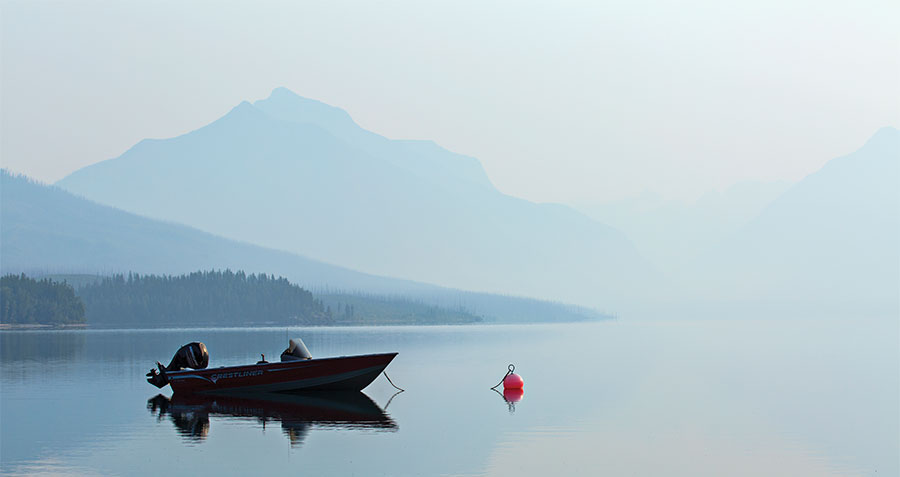
A seemingly missed opportunity: “Quiet Morning at Lake McDonald.” Canon EOS 5D Mark III, EF 100-400 mm ƒ4.5-5.6 L USM lens at 100mm, ISO 100, ƒ11 at 1/125 sec, Gitzo tripod.
My work as editor of a magazine similar to Carolina Country gives me plenty of opportunities to practice one of my true passions: photography. Although I have had the pleasure of taking photos of countless inspiring subjects for the magazine, I also find inspiration wandering down the trails of both national and state parks, and driving the winding backroads of our country, waiting for the perfect photo to present itself..
When on such trips, I feel like I can’t miss any photographic opportunity. That means being up before sunrise and out until after sunset.
That made for a few long days one summer when I was in West Glacier, Montana. I began my last day there at the Apgar Visitor Center just before sunrise. I had scouted the area the day before and thought the rental boats moored at the southern end of Lake McDonald might make an interesting subject with the golden light of a brilliant sunrise filtering in from the east (the right side of the image).
As I took this image, I was a bit disappointed that I had missed my last chance to capture what I had seen in my head.
I set up my tripod on the dock, composed the shot with a boat at the lower left third of the frame and waited for the light. As it turned out, the sun didn’t break through the haze in the distance until quite a while after sunrise. This meant the streams of sunlight I had hoped to capture as they raked across this landscape just weren’t going to happen. Instead, a light cloud cover and a smoky haze from a nearby fire in Glacier National Park had filled the sky, obscuring the sunrise and the mountains in the background.
As I took this image, I was a bit disappointed that I had missed my last chance to capture what I had seen in my head. So, instead, I framed the most interesting composition I could find with the boat as the central subject. As my shot transformed into a monochromatic palette, the bright red mooring buoy added a glimmer of color that took on a central position in this composition. You might say it creates an anchoring point for your eye as you move through the image.
It wasn’t until months later, when I revisited my edit on the images I captured that day, that I took notice of this one again. Because it hadn’t turned out to be what I wanted that morning, I had largely ignored it. In hindsight, it tells its own story.

A little Photoshop work revealed the subtleties of “Foothills Parkway Sunrise.” Canon EOS 6D, 70-200 mm, 2.8 L-series lens, Gitzo tripod, ISO 100, ƒ32 at 1/10 sec.
After the shot
The creative process doesn’t end once a photo is taken. In my humble opinion, Ansel Adams would have loved digital photography and Photoshop. As one of the most important American photographers, he always pushed his equipment, darkroom techniques and vision to produce his masterful prints.
He is famously quoted as describing his process by saying, “The negative is the equivalent of the composer’s score and the print the performance.”
This concept is as true today as it was the day he said it — though the terminology may have changed a bit in our digital world. His physical negative, most often glass, only came to life after it was painstakingly processed in a darkroom to reveal the latent image, which was then printed onto a piece of photographic paper via an enlarger. Each step bore his trademark specificity and love for the craft. He utilized every tool available to create masterworks with pure whites and blacks and every tone of his zone system in between.
Today we talk about capturing images as raw files, importing them into a digital photo-editing software and outputting the final files to myriad devices. Each step of this process requires a skillset that can be a lifelong learning curve.
On occasion, I overhear comments at a gallery or a show that go something like this: “That’s not real; it must be Photoshopped.” So, in the commenter’s mind, this particular photograph is worthless because of the computer’s role.
After taking a deep breath, my slightly irritated answer follows something like, “Yes, it is real, and, yes, it is Photoshopped.”

An unexpected opportunity at the end of a hike led to “Roosting Turkeys at Radnor Lake.” Canon EOS 5D Mark III, 100-400 mm, 4.5-5.6 L IS USM lens with circular polarizer ISO 6400, ƒ5.6 at 1/125 sec, Gitzo tripod.
Then I try to provide a little education by describing my technique. To create successful photographs, it all begins with strong compositions and great light. Then the raw file is brought to life with minimal processing in Photoshop. The steps usually involve setting my black and white points for highlights and shadows, tweaking the color balance if needed, using a curve to set contrast and then sharpening the image.
These steps reveal the subject’s details, tones and subtleties I saw with my eye when I photographed it.
Properly using the tools available to us today is both a blessing and a curse. I choose to use these tools to show the best example of what I actually saw. Some may take artistic license too far in this realm and rely on digital darkroom tools to attempt to make mediocre photos more successful.
There is no magic tool to fix bad compositions or uninteresting subjects. Interesting light and strong compositions will win out over poorly executed photos any day — no matter how much they are processed.
In the end, it’s really about the light and how you see the world.
About the Author
Robin Conover is editor of The Tennessee Magazine, a publication of the Tennessee Electric Cooperative Association.-
Shoot your best photos
-
Share this story: